How to Insert and Attribute Images
Understanding how to insert and attribute images is a critical skill for all CopyPress creatives. Unless otherwise stated, all our articles require at least one attributed image.
Most of our clients request at least one image per article. The image should be relevant to the content and free for commercial use. When choosing an image for your article, try finding one that improves or complements the content and matches the client's branding.
How To Search for Images
The most popular sites to search for images are Flickr, Unsplash, Pexels, and Pixabay, though you can use any site that has images available for commercial use. It's crucial to ensure the image you use does not have a copyright, unless otherwise stated in the article's instructions.
For this example, we'll use Flickr. Start by searching for the topic of the article. Make sure to change "Any License" to "Commercial use & mods allowed."

When you find a photo that you would like to use, click to open it.

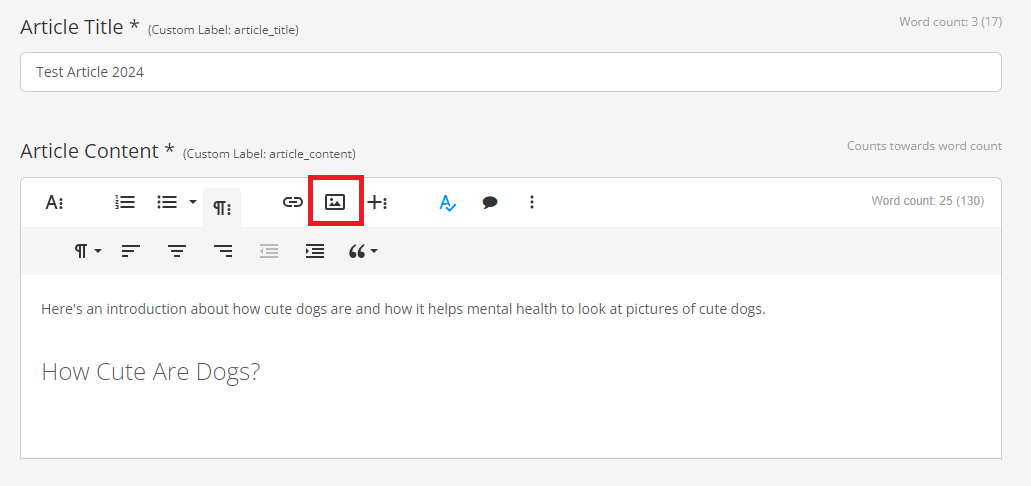
How To Insert Images
Click on the down arrow in the right-hand column.

Select “View all sizes.”

On the next page, select the size “Medium 500” (if Medium 500 is not an option, choose the next closest size).

Right click on the photo and select “Copy Image address” or “Copy Image URL.”

On the article page in Dante, place the cursor in the article content where you would like to insert the image.

Click on Insert Image icon (mountain icon).
When the image box opens, paste the image URL and click "Insert."
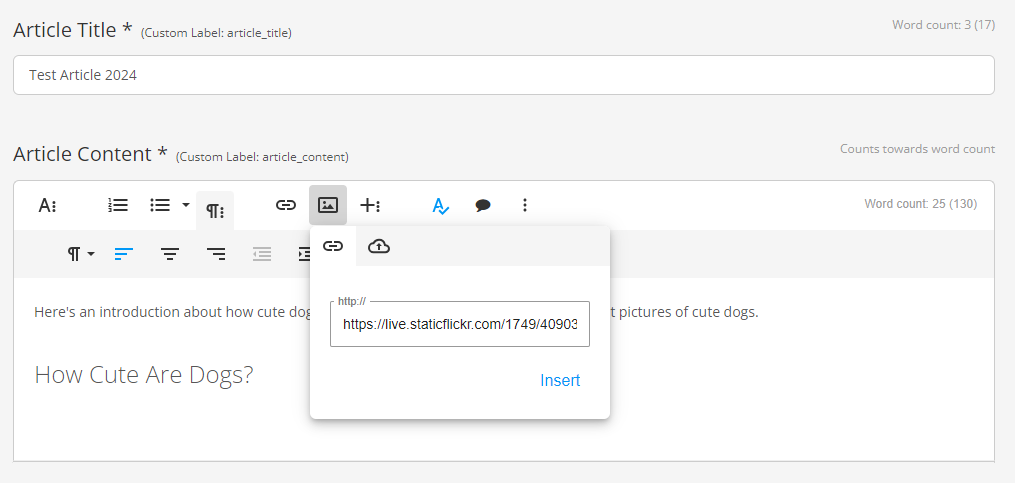
Your image will appear in the content window.

How To Attribute Images
It's important to properly attribute all of your images in articles.
Hit Enter to add the attribution on a new line. Do not use the Image Caption option.
Write attribution using the following format: Image via Flickr by [Username].
- Some clients have different attribution guidelines. Please check the image guidelines in the style guide before getting started on any article.
Link to the webpage by adding the webpage URL on the word Flickr (Need help inserting links? Review instructions in our guide to linking).Don’t link to the Image URL (the same URL that you used to insert the image)
A properly attributed image from Flickr will look like this in Dante:

Here's the image and link so you can see the URL:

Image via Flickr by EDrost88
The link should go on "Flickr" and direct the reader to the page with all available image sizes. The link format should end in "/sizes/m/" and not the file format, like ".jpg" or ".png."
Tips for Inserting and Attributing Images
- The image URL to insert the image should be: https://live.staticflickr.com/8104/8631368705_907915f30e.jpg
- This is the URL to use when adding the image (Not the attribution link).
- It should end in a file format ".jpg" or ".png" for most cases.
- The webpage URL for attribution should be: https://www.flickr.com/photos/a_peach/8631368705/sizes/m/
- This is the URL to use in the attribution.
- It should end in "/sizes/m."
- Proper Attribution: Image via Flickr by A_Peach.
Don’t use the user page URL for anything in the attribution.